OpenRC Software Documentation
Index
introduction
General Information
Our copying systems of the series DISCUS can do more than record and label CDs, DVDs, DVD-DL, Blu-Ray or Blu-Ray-DL. Network-controlled and integrated in existing infrastructure, there are no limits to the application areas and possibilities.
The CD/DVD/BD copying systems with integrated priting systems are manufactured in Germany. They are designed for resist stresses and strains. The industrial robot systems for professional use of optical media have the following characteristics:
- 4 to 6 CD/DVD/BD devices
- capacity of up to 600 optical media
- integrated PC
- network-compatible
- warranty up to 5 years
- industrial components of high-quality
- choice of different printing system
- mixed production of CD, DVD and Blu-Ray possible
The OpenRC System is a development of X-Net Technologies GmbH. The software is implemented in the programming language "python". It is provided by X-Net Technologies GmbH / Austria and can be changed under the X-Net Closed Source License (X-Net XSL). The source code is available for customers purchasing the OpenRC System.
The OpenRC System user interface (UI) is web-based and optimized for the use with Mozilla Firefox, Chrome and Safari. All relevant devices like notebooks, tablets and mobile phones are supported.
The following sections describe all functions of the UI in detail.
terminology
- job: the process of writing data on one single disc is called "job".
- ticket: a "ticket" is made up of a certain number of jobs to be defined; the number of jobs are defined when creating a new ticket.
- bin: a "bin" describes the storage place for dics; where the robot takes or puts down the dics.
- drive: a "drive" differs in whether it records a disc or verifies it after recording.
- printer: the "printer" is responsible for the label printing on the disc.
OpenRC Software
OpenRC main components
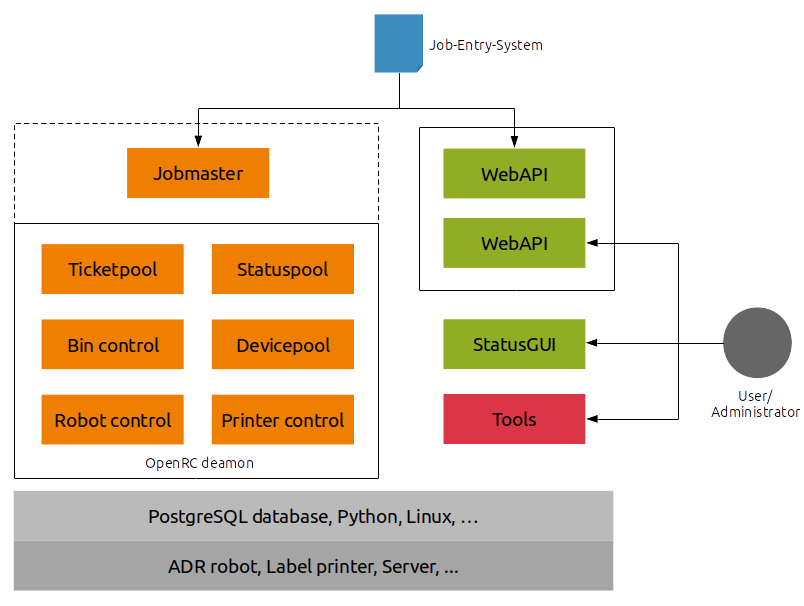
JobEntrySystem - Jobmaster and OpenRC WebAPI
The Job-Entry-System mainly consists of the Jobmaster which is often called JESMaster. There is also a web interface which enables you to send jobs/tickets over Zope.
The Jobmaster is responsible for retrieving and managing tickets. When a ticket is sent it can be started automatically or it waits for being “shot” (see Starting a job („Shooting“)). For information about tickets and how to send tickets please consult “Ticket API” documentation.
The Jobmaster is running on port 8080 by default. If you can't reach this port e.g. through firewall restrictions you can use the OpenRC WebAPI to send tickets over Zope. Zope is running on port 80 by default and so there should be less restrictions on firewall issues.
| Note: The Jobmaster is often started with the rest of the OpenRC system as OpenRC daemon but it can also run independently (e.g. on a separate server). Please refer to additional documents or contact your system administrator for information on this issue! |
OpenRC daemon
The OpenRC daemon is the main component which handles, burns, verifies, prints and outputs the medium according to so-called jobs.
It consists of various subcomponents (these are the most important ones):
- Robot control: Manages the robots status and moves the robot and media.
- Printer control: Responsible for printer status and printing (labeling) the media.
- Bin control: Manages the bin status e.g. which bin holds which media (CD, DVD, ...).
- Devicepool: The CD/DVD writers are managed in a pool that can be asked for a free device to burn or verify media.
- Ticketpool: This is the main communication line between the OpenRC daemon and the Jobmaster. All information on tickets that the OpenRC daemon requests is retrieved by the Ticketpool which communicates with the Jobmaster.
- Statuspool: The Statuspool holds a snapshot of the status of all other OpenRC components and reports it to the user interfaces.
Job Lifecycle
For all jobs the lifecycle looks like this (simplified):
create ticket -> send ticket -> start job -> job processes -> job ends (done/error)
Whether the job is immediately started or it waits for being shot depends on the ticket and your actual configuration (e.g. trough customer changes).
For Burnjobs a detailed lifecycle would be:
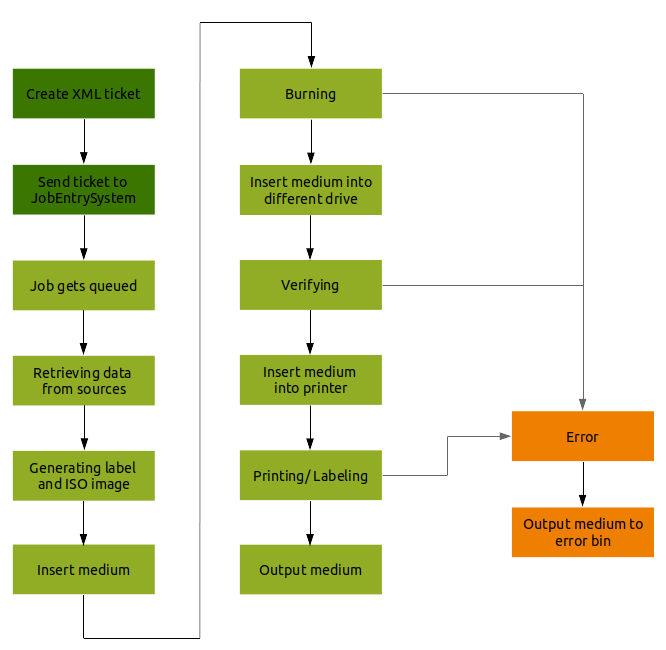
Sending a ticket
Typically OpenRC jobs are defined by so called tickets which are in fact XML files. They can be sent to Jobmaster and OpenRC WebAPI via HTTP POST method. The XML data has to be encoded (URL/HTTP encoded) and sent as a parameter called “xml”.
To send a ticket to the Jobmaster a HTTP POST request with parameter xml=<ticket data> has to be issued on http://<server>:8080/api/send_ticket.
The same request can be issued on OpenRC WebAPI (if installed) at http://<server>:80/api/send_ticket whereas api is the id of the OpenRC WebAPI object and assuming that Zope runs on port 80 (default).
For information on installing the OpenRC WebAPI please see “WebGUI – Administration Guide” and for further information on creating and sending a ticket please consult “Ticket API” documentation.
There's also a tool called send.py that sends a local file (from the server) to the Jobmaster.
Starting a job ("Shooting")
Depending on the ticket (<quantity>) and your system configuration a job gets started automatically when the ticket arrives at Jobmaster. Otherwise the ticket waits for getting started (“shot”) manually.
This can be done via the OpenRC WebGUI or the StatusGUI. Please read the appropriate user manual.
The job will then be queued, prepared and processed, executing the requested actions (burning, verifying, printing,...).
Aborting a job
If a job is aborted by a user/operator via one of the interfaces its state changes to “error” and the job is declared as “stopped by user”. The medium is then outputted at the error bin.
| Note: The job may not be aborted immediately because the current action (e.g. burning, printing,...) will be finished! |
End of a job
If a job finishes without errors the medium is moved to output bin and the job's status changes to “done”.
However, if one of the processes fails (e.g. a burn error caused by bad media) the job gets set to error status with an adequate error message. The job can be (definitely) canceled or restarted after this.
Deleting of a job/ a ticket
Depending on which value is set for the store option in the ticket (see “Ticket API” documentation) all data (downloaded files, ISO image, prepared label, etc.) is either deleted after the ticket/job finished or kept stored on the local system.
If a job ended with an error the data is stored in any case.
If the store option is set to “yes” the data can be deleted by either sending a delete ticket (this can be found in “Ticket API” documentation),by deleting the job/ticket via one of the interfaces or by using the autodelete functions (see Autodelete Functions).
Ticket and job status
The system distinguishes between job status and ticket status.
A ticket is only considered successfully done when all of its jobs are completed successful. There are two ways for a ticket to have more than one job, either by specifying a quantity or by splitting a disc (or by a combination of those).
If an error occurs during job processing (e.g. the bin is empty or verifying failed) the job is set to status “error” while the ticket is still considered “running” since the job can be restarted via one of the interfaces.
Only if the job is then canceled by an operator the ticket status is set on “error” since then the job isn't available for restarting anymore. If the job is restarted and then finishes error-free the ticket status changes to “done” (if all of its other jobs are finished too).
For a ticket with several jobs to be considered erroneous all jobs have either been canceled or completed successfully.
If data is split onto more discs the ticket status behavior is similar to the above, the ticket is only considered successful if all discs are done without errors.
Autodelete Functions
The autodelete functions ensure that the file system doesn't get full by deleting data and information after a certain time, distinguishing between successful and erroneous tickets (Please read “Ticket and job status” for more information about job and ticket status).
The available settings are:
- Number of days to wait before deleting the ...
- ... data of successfully finished tickets
- ... information of successfully finished tickets
- ... data of erroneous tickets
- ... information of erroneous tickets
- Number of days before auto-canceling erroneous tickets
The amount of days can be configured in the /etc/openrc(<version>/init.sql file.
Note that it is possible to specify floating point numbers, e.g. 0.25 for 6 hours!
The init.sql file does not exist in a standard installation you have to call “/opt/usr/openrc/bin/db.py dump” once for the file to be created and used.
Even when the data is deleted a job/ticket can still be restarted as long as the information is stored in the database (making it necessary to retrieve the data from the original sources again).
User interface
Icons Overview
| Robot status page | |
| Create new job | |
| System control | |
| Profil of the user | |
| Refresh current status | |
| Go to the next page | |
| Column sort | |
| Directory of the file system | |
 |
Open dropdown menu |
Login/ Logout
When opening the interface, the login process to the OpenRC software starts. The login mask requires username and password. After successful authentication, the user is redirected to the status page of a robot (see chapter Homepage - Status Page).
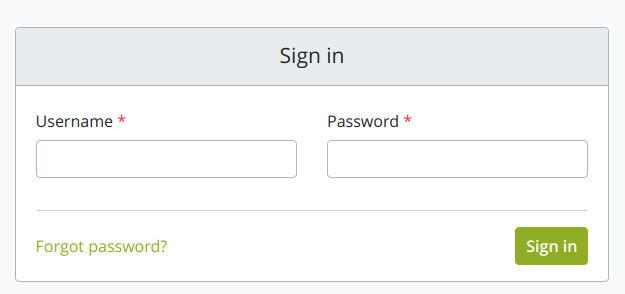
Figure 1: Login mask
With a click on the user button ![]() in the upper right corner, a drop down menu opens. By clicking on the link
in the upper right corner, a drop down menu opens. By clicking on the link ![]() the user is immediately logged out of the OpenRC System. There won't be an additional demand. The login form is displayed afterwards.
the user is immediately logged out of the OpenRC System. There won't be an additional demand. The login form is displayed afterwards.

Figure 2: Menu bar with sign out link in the user drop down menu
Forgot your password?
If a user has forgotten the password, the user can regain access to the software by clicking on the displayed link  at the bottom of the login mask (see figure 1).
After clicking on the link  , the standard procedure to reset a password starts. A new window opens to enter the user email address. By clicking on
 ![]() the request to set a new password is started.
the request to set a new password is started.
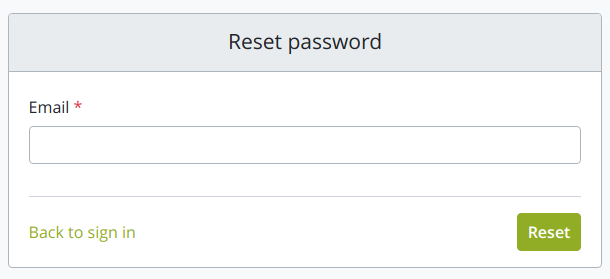
Figure 3: email input form for resetting the password.
A message appears - "We've emailed you instructions for setting your password. If you don't receive an email, please make sure you've entered the address you registered with, and check your spam folder."
This email contains a link. By clicking on it, the user is redirected to the "change password" form to set the new password (see figure 4). To finish this process the user has to click on ![]() and the new password is saved after a successful check.
and the new password is saved after a successful check.
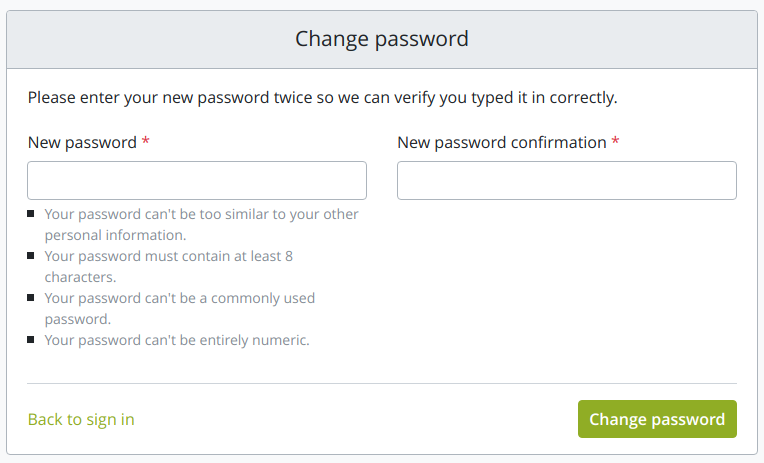
Figure 4: new password input form for resetting the password
Homepage - Status Page
The main window, which is also the status page of the robot, is split into four areas:
- Top area - includes the menu bar at the top of the page
- Master area - contains the master table, which shows all tickets for the Job-Entry-System.
- Worker area - contains the worker table, which displays the jobs on the (local) burnstation.
- Robot area - contains the bin and drive or printer control section.
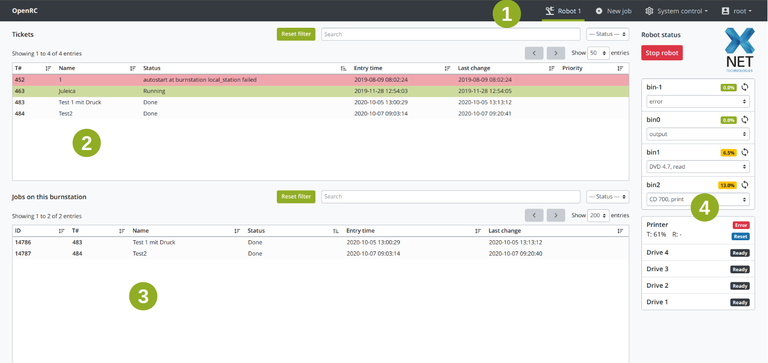
Figure 5: Overview of the status page (main window)
1. Top Area
The top area, which is basically the menu bar, is used for the navigation in the software. It contains four menu items with following functions:
![]() Robot 1 - depending on how many robots are connected, there are correspondingly as many menu items "Robot" marked with the respective ascending number. This menu item takes the user to the status page of the respective robot (See chapter Status Page).
Robot 1 - depending on how many robots are connected, there are correspondingly as many menu items "Robot" marked with the respective ascending number. This menu item takes the user to the status page of the respective robot (See chapter Status Page).
![]() New job - This menu item starts the procedure to create a new job (See chapter Create new job).
New job - This menu item starts the procedure to create a new job (See chapter Create new job).
![]() System control - By clicking on this menu item, various management functions and settings for the system can be made (see chapter System Control).
System control - By clicking on this menu item, various management functions and settings for the system can be made (see chapter System Control).
![]() Profil - When the user clicks on its username, a dropdown menu opens and the user can log out of the system with one click (see chapter Login/ Logout).
Profil - When the user clicks on its username, a dropdown menu opens and the user can log out of the system with one click (see chapter Login/ Logout).
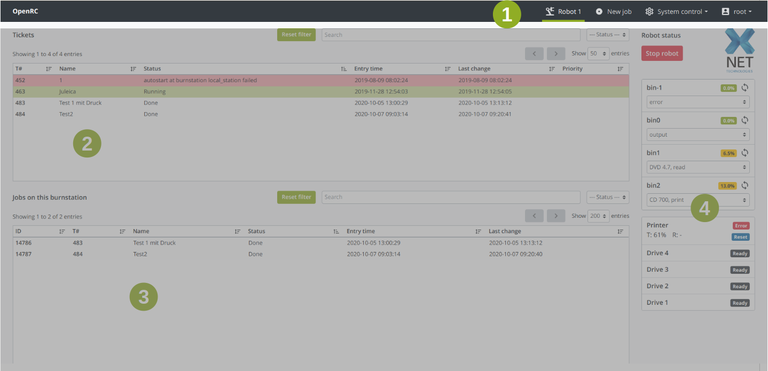
Figure 6: Menu bar at the top of the status page
2. Master Area
The master area contains the ticket table, which shows all the created tickets. This ticket list corresponds to the so-called Jobmaster. (verlinkung nach oben)
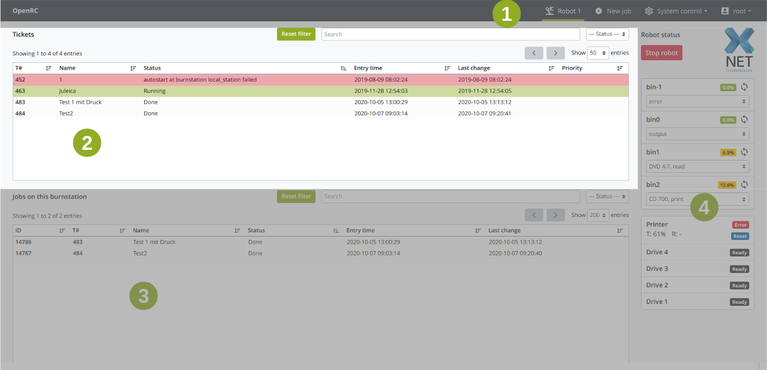
Figure 7: Ticket area with current tickets
Table Filters
The ticket list can be filtered by the input field at the top or by the status via the dropdown field ![]() . Both filter settings can be reset afterwards with the button
. Both filter settings can be reset afterwards with the button ![]() .
.
With the gray arrows ![]() the user can switch to the next page, if there are already several list entries. The user can also determine the number of displayed entries per page using the drop down menu beside the gray arrows. Each column can also be sorted in ascending or descending order by clicking on the column header
the user can switch to the next page, if there are already several list entries. The user can also determine the number of displayed entries per page using the drop down menu beside the gray arrows. Each column can also be sorted in ascending or descending order by clicking on the column header ![]() .
.
Table Columns
The ticket table contains of the following columns:
- T# - the internatl ID of the ticket.
- Name - the name of the ticket.
- Status - the current status of the running ticket.
- Entry time - Timestamp when the ticket was sent to the Job-Entry-System.
- Last change - Timestamp of the last status change of the ticket.
- Priority - Priority level of the current ticket
Status of the table entries
The background color of a ticket depends on its actual status.
|
|
The ticket is waiting to start because all the robots are currently busy. |
|
|
A ticket has been started on a robot and the data is currently being copied into the cache and an iso file is generated. The label image for printing is also created in this step. |
|
|
The ticket is processed on a robot |
|
|
All jobs on this ticket had an error |
|
|
Ticket was successfully completed and thus all associated jobs as well |
|
|
The ticket and the associated data from the cache are being deleted |
|
|
The processing of the tickets was stopped by the user, see pause ticket in the ticket menu |
Menu
The menu can be opened by left-clicking on a row in the table. Depending on the current ticket status, appropriate actions can be performed on the ticket. Basically there are three submenus with the following actions:
- Ticket
- The submenu "Details" opens the detail view of a ticket.
- A running ticket contains also an input field to set the priority.
- Job control
- Start job
Starts the selected ticket on the (local) burnstation - Pause job
Pauses the selected running ticket on the (local) burnstation - Delete ticket
Removes the selected ticket and all its jobs from the system. Works only if all of the tickets jobs are done or erroneous. - Cancel job
Cancel all running jobs of this ticket on the local burnstation with the subdivision "excluding user errors" or "all errors." - Restart job
Restarts/Continues all jobs of the ticket that are on an error status (error or waiting for user input). So another subdivision can be made by "user errors only" or "all errors"
- Start job
- Show/ hide
- Contains various submenus to show or hide specific table columns.
| Note: It may take a short moment for the action to complete |

Figure 8: Master table
3. Worker Area
The worker area contains the worker table. It displayes the jobs on the (local) burnstation. The entries in the table are deleted according to the set days in the system control.
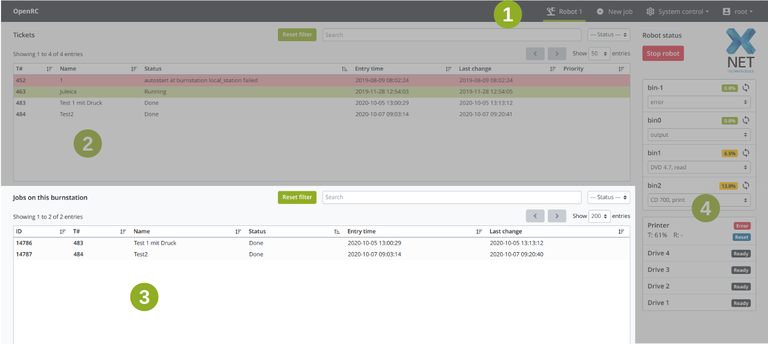
Figure 9: Job area with current list of jobs
Table Filters
The ticket list can be filtered by the input field at the top or by the status via the dropdown field ![]() . Both filter settings can be reset afterwards with the button
. Both filter settings can be reset afterwards with the button ![]() .
.
With the gray arrows ![]() the user can switch to the next page, if there are already several list entries. The user can also determine the number of displayed entries per page using the drop down menu beside the gray arrows. Each column can also be sorted in ascending or descending order by clicking on the column header
the user can switch to the next page, if there are already several list entries. The user can also determine the number of displayed entries per page using the drop down menu beside the gray arrows. Each column can also be sorted in ascending or descending order by clicking on the column header ![]() .
.
Table Columns
The ticket table contains of the following columns:
- ID - The internal ID of the job.
- T# - The ID of the ticket this job was started from.
- Name - The name of the ticket.
- Status - The current status of the running ticket.
- Entry time - Timestamp when the ticket was started.
- Last change - Timestamp of the last status change.
Status of the table entries
The background color of a job depends on its actual status.
|
|
The job is waiting to be started. Only a specific number of jobs can run simultaneously (this number is configured in the database) |
|
|
All job data is copied into the cache and an ISO-file is generated. The label image for the printing process is also created in this step. |
|
|
The disc is burned and a progess number in percentage is displayed. |
|
|
The job waits for a free device to burn the disc |
|
|
The job waits for a free device to verify the burned disc |
|
|
The job waits for a free printer to print the burned disc |
|
|
The print is prepared. Depending on the printer model various steps are done, e.g. for Teac printers the image is printed onto the transfer ribbon |
|
|
Error - see Note below |
|
|
User Error - see Note below |
|
|
The burning job has been successfully completed. |
| Note: The difference between "Error" and "User Error" is that the Error is final, for example a burn error. In the case of a user error, the software waits for an interaction with the user, e.g. the printer ribbon is empty. The user can restart the job after fixing the error. |
Menu
The menu can be opened by left-clicking on a row in the table. Depending on the current ticket status, approoriate actions can be performed on the ticket. Basically there are three submenus with the following actions:
- Logging (only visible, if the clicked line contains a job)
- Show log
Opens the Log View for the selected job. This view contains a table, which has the same filter and paging functions as the main table on the status page.
- Show log
- Job control (only visible, if the clicked line contains a job)
- Cancel job
Cancels the selected job. If the job-status is already DONE or ERROR the job will be deleted. - Restart job (only visible, if the job status is DONE or ERROR)
Restarts the selected job - Continue job (see figure 10b below)
- Cancel job
- Show/ hide
- Contains various submenus to show or hide table columns.
| Note: It may take a short moment for the action to complete |

Figure 10a: Worker table
When a certain job was paused by the user, it can be restarted by right clicking on the job and selecting "Job control / Continue job". Afterwards the job continues the burining process, where it has stoppped.
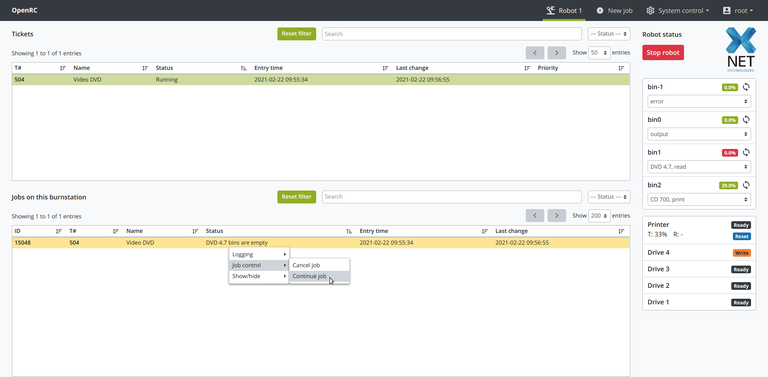
Figure 10b: Worker table
4. Robot Area
The robot area contains the Bin control and Printer and Drive Status control. There the user can read the status of the bins and drives and can configure them there.
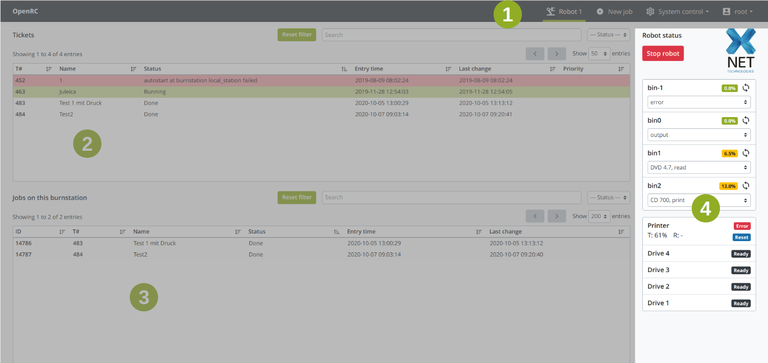
Figure 11: Robot status area with two sections
Bin Control
One robot can have up to 5 bins, which are shown in the bin control section:
- bin-1 - Error bin
- bin0 - Output bin or error bin
- bin1 to 3 - input bins (CD, DVD, BD), error bin or output bin
Each bin shows the filling level in percent  , can quiere the current status by updating the bin with the
 ![]() button and can have a type, which can be changed per bin by using the corresponding drop down menu. The following setting options for the types are:
button and can have a type, which can be changed per bin by using the corresponding drop down menu. The following setting options for the types are:
- error - if an error occured while recording the CD, it will be put on this bin (Default setting: bin-1)
- output - if the disc was successfully recorded, it will be put on this bin (Default setting: bin-0)
- print - when only a label print job is requested, the CDs are taken from this bin
- read - if a copy and read job is requested, the CDs are taken from this bin
Only bin 1 to 3 can select a combination of input types (CD, DVD, BD) and the four types mentioned above.
| Note: However, that the combination of input and output or input and error is not possible. |
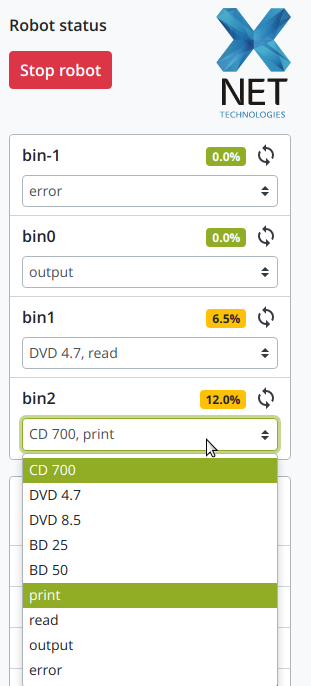
Figure 12: Bin control section
The ![]() button signals that the system is running and that the ordered tickets are being processed. When the user clicks it, the button turns green
button signals that the system is running and that the ordered tickets are being processed. When the user clicks it, the button turns green ![]() and the whole menu bar turns red to indicate that all running jobs and tickets has been stopped. As soon as the user clicks the button again, the robot starts and continues processing the tickets and jobs. The button turns red again
and the whole menu bar turns red to indicate that all running jobs and tickets has been stopped. As soon as the user clicks the button again, the robot starts and continues processing the tickets and jobs. The button turns red again ![]() .
.
Printer and Drive Status Control
In this table the user can read the status of the printer, as well as the processing status of the four drives 1 - 4. There are always 2 drives for the recording process and 2 for the verifying process.
The printer also displayes the fill level of the transfer film (T) and the ribbon (R) in percent.
If there are any problems with the printer, it can be reset with the  button.
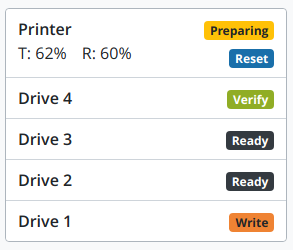
Figure 13: Printer and drive control section
The following status are possible for the printer:
 |
The printer is being prepared for printing (e.g. for TEAC printers the image is printed onto the transfer ribbon). |
 |
The printer is ready and is waiting for jobs. |
 |
The actual printing process. |
 |
The printer is reserved for a job and the disc is in the process of being moved to the printer. |
 |
The printer has an error. E.g. it is not turned on or there was a ribbon/cartridge error, see job list for more details. |
The following status are possible for the drives:
 |
The drive is used to verify a disc. |
 |
The drive is ready and is waiting for jobs. |
 |
The drive is used to read a disc. |
 |
The drive is used to write a disc. |
 |
The drive was disabled by the user. E.g. useful if it is not working correctly. |
 |
An error was detected, ususally the system will try to fix the error automatically e.g. by removing the disc from the drive. |
Create new Job
When clicking on the menu item ![]() New job, a page opens and contains a wizard that guides through the creation process step by step. In the following subchapters, the wizard is explained step by step and possible setting variants are illustrated.
New job, a page opens and contains a wizard that guides through the creation process step by step. In the following subchapters, the wizard is explained step by step and possible setting variants are illustrated.
Step 1
The first step is to select the type of the new job. There are different options that the user can choose:
- Burning jobs (ISO) - the data to be recorded are burned from an ISO file to the disc.
- Burning jobs (Folder) - the data to be recorded are burned from a folder file to the disc.
- Copy jobs - the data to be recorded is read from an inserted disc and copied to an empty and new disc.
- Print jobs - the Label of the CD/ DVD is printed on the disc.
- Read jobs (as files) - the data is read in from a disc and stored on the robot itself (e.g. for digital archiving)
To go to the next step, click on ![]() .
.
Depending on which type of job was selected, the wizard will vary. The next steps are now explained in detail per job type.

Figure 14: Step 1 create new job - Select a job
Burning jobs (ISO)
Step 2
In the second step the image (ISO, BIN, RAW) has to be selected from the shown file system of the robot for recording the disc. By clicking on the desired file, the respective filename is written into the input field on the right.
To go to the next step, click on ![]() .
.

Figure 15: Step 2 create new job - Burning jobs (ISO)
Step 3
The third step is to select a picture for the label. The user can use the checkbox "with label" to decide whether a label is printed at all. If a label is to be printed, only allowed images from the robot's file system are displayed. By clicking on the desired image, the respective filename of the image is written on the right.
To go to the next step, click on ![]() .
.

Figure 16: Step 3 create new job - Burning jobs (ISO)
Step 4
The fourth step is to set the parameters for the number of copies, percentage of verification after recording and the name of the ticket. The percentage can be between 0 % and 100 % and defines the accuracy with which the disc is verfied after the recording process.
To go to the next step, click on ![]() .
.

Figure 17: Step 4 create new job - Burning jobs (ISO)
Step 5
The last step shows a detailed summary of the entered data. The user can check them again before finally creating the ticket by clicking the button ![]() .
.
Figure 18: Step 5 create new job - Burning jobs (ISO)
Step 6
After the ticket has been created, the user gets a last feedback that the ticket has been created successfully. The button ![]() takes the user back to the beginning of the wizard.
takes the user back to the beginning of the wizard.

Figure 19: Step 5 create new job - Burning jobs (ISO)
Burning jobs (Folder)
Step 2
In the second step the directory has to be selected from the shown file system of the robot for recording the disc. By clicking on the icon ![]() of the desired directory, the respective name of the directory is written into the input field on the right.
of the desired directory, the respective name of the directory is written into the input field on the right.
To go to the next step, click on ![]() .
.

Figure 19: Step 2 create new job - Burning jobs (Folder)
Step 3
The third step is to select a picture for the label. The user can use the checkbox "with label" to decide whether a label is printed at all. If a label is to be printed, only allowed images from the robot's file system are displayed. By clicking on the desired image, the respective filename of the image is written on the right.
To go to the next step, click on ![]() .
.

Figure 20: Step 3 create new job - Burning jobs (Folder)
Step 4
The fourth step is to set the parameters for the number of copies, percentage of verification after recording and the name of the ticket. The percentage can be between 0 % and 100 % and defines the accuracy with which the disc is verfied after the recording process.
To go to the next step, click on ![]() .
.

Figure 21: Step 4 create new job - Burning jobs (Folder)
Step 5
The last step shows a detailed summary of the entered data. The user can check them again before finally creating the ticket by clicking the button ![]() .
.

Figure 22: Step 5 create new job - Burning jobs (Folder)
Step 6
After the ticket has been created, the user gets a last feedback that the ticket has been created successfully. The button ![]() takes the user back to the beginning of the wizard.
takes the user back to the beginning of the wizard.

Figure 19: Step 5 create new job - Burning jobs (ISO)
Copy jobs
Step 2
In the second step the directory has to be selected from the shown file system of the robot for recording the disc. By clicking on the icon ![]() of the desired directory, the respective name of the directory is written into the input field "Location". The ticket name must be entered manually with one of the appropriate endings (ISO, RAW, BIN, IMG) in the "Name" field provided.
of the desired directory, the respective name of the directory is written into the input field "Location". The ticket name must be entered manually with one of the appropriate endings (ISO, RAW, BIN, IMG) in the "Name" field provided.
To go to the next step, click on ![]() .
.

Figure 23: Step 2 create new job - Copy jobs
Step 3
The third step is to select a picture for the label. The user can use the checkbox "with label" to decide whether a label is printed at all. If a label is to be printed, only allowed images from the robot's file system are displayed. By clicking on the desired image, the respective filename of the image is written on the right.
To go to the next step, click on ![]() .
.

Figure 24: Step 3 create new job - Copy jobs
Step 4
The fourth step is to set the parameters for the number of copies, percentage of verification after recording and the name of the ticket. The percentage can be between 0 % and 100 % and defines the accuracy with which the disc is verfied after the recording process.
To go to the next step, click on ![]() .
.

Figure 25: Step 4 create new job - Copy jobs
Step 5
The last step shows a detailed summary of the entered data. The user can check them again before finally creating the ticket by clicking the button ![]() .
.
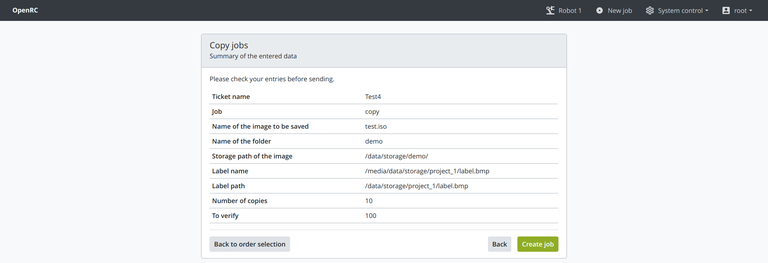
Figure 26: Step 5 create new job - Copy jobs
Step 6
After the ticket has been created, the user gets a last feedback that the ticket has been created successfully. The button ![]() takes the user back to the beginning of the wizard.
takes the user back to the beginning of the wizard.

Figure 19: Step 5 create new job - Burning jobs (ISO)
Print jobs
Step 2
The second step is to select a picture for the label. The user can use the checkbox "with label" to decide whether a label is printed at all. If a label is to be printed, only allowed images from the robot's file system are displayed. By clicking on the desired image, the respective filename of the image is written on the right.
To go to the next step, click on ![]() .
.

Figure 27: Step 2 create new job - Print jobs
Step 3
The third step is to set the parameters for the number of copies and the name of the ticket.
To go to the next step, click on ![]() .
.

Figure 28: Step 3 create new job - Print jobs
Step 4
The last step shows a detailed summary of the entered data. The user can check them again before finally creating the ticket by clicking the button ![]() .
.

Figure 29: Step 4 create new job - Print jobs
Step 5
After the ticket has been created, the user gets a last feedback that the ticket has been created successfully. The button ![]() takes the user back to the beginning of the wizard.
takes the user back to the beginning of the wizard.

Figure 19: Step 5 create new job - Burning jobs (ISO)
Read jobs
Step 2
In the second step the directory has to be selected from the shown file system of the robot for recording the disc. By clicking on the icon ![]() of the desired directory, the respective name of the directory is written into the input field "Location".
of the desired directory, the respective name of the directory is written into the input field "Location".
To go to the next step, click on ![]() .
.
Figure 30: Step 2 create new job - Read jobs
Step 3
The third step is to set the parameters for the number of copies and the name of the ticket.
To go to the next step, click on ![]() .
.

Figure 31: Step 3 create new job - Read jobs
Step 4
The last step shows a detailed summary of the entered data. The user can check them again before finally creating the ticket by clicking the button ![]() .
.

Figure 32: Step 4 create new job - Read jobs
Step 5
After the ticket has been created, the user gets a last feedback that the ticket has been created successfully. The button ![]() takes the user back to the beginning of the wizard.
takes the user back to the beginning of the wizard.

Figure 19: Step 5 create new job - Burning jobs (ISO)
System control
The system control can be found in the menu bar to the left of the users name. Clicking on it opens a drop down menu with indivituall functions:
- Drives
- OpenVPN
- Reset OpenRC database
- Restart OpenRC system
- Shutdown system
- Reboot system
- Download logfiles

Figure 33: System control drop down menu with functions
1. Drives
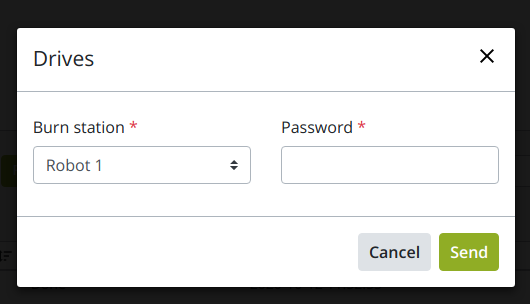
When the user clicks on the function "Drives" in the system control drop down menu, a window opens in which the login data for the respective burn stations is required.
Figure 34: System control - drives login
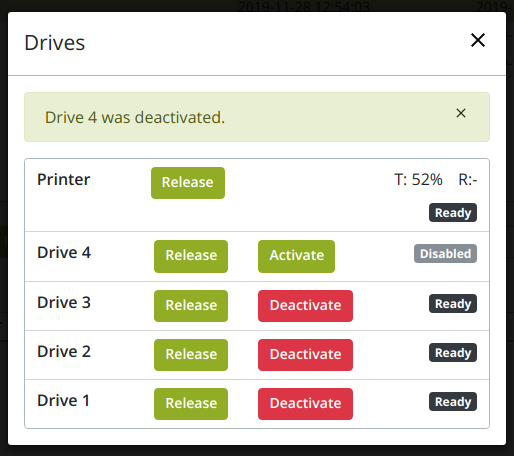
After a successfull login, the printer and drive control table is displayed with additional functions.
 - If an error has occurred in the running recording process, the drive can no longer be released automatically for the next ticket. With this button the drive can be released manually by the user itself. Such manual error corrections occur mainly at the printer.
 - With this button the user can deactivate the corresponding drive.
 - With this button the user can activate the corresponding drive.
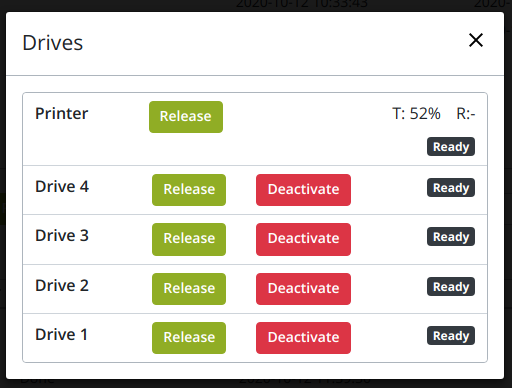
Figure 35: System control - Printer and drive control section
If the user clicks on the  button, it takes a short moment until the corresponding drive is changes to the status
  . This status change is also displayed in the printer and drive control section on the homepage - status page.
Figure 36: System control - Drive 4 deactivted
2. OpenVPN
When the user clicks on the function "OpenVPN", a window opens in which the login data for the respective burn stations are required. After a successful authentication the system estabilishes an OpenVPN connection to X-Net Services GmbH.
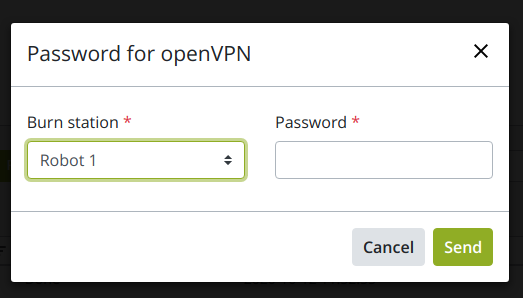
Figure 35: System control - openvpn login
3. Reset OpenRC database
When the user clicks on the function "Reset OpenRC database", a window opens in which the burn station and a password are required. After a successful authentification the database is completely reset. This means that all running jobs are aborted and all entries are deleted.
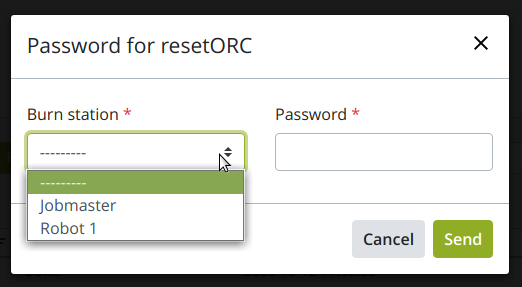
Figure 36: System control - Reset OpenRC database
4. Restart OpenRC system
When the user clicks on the function "Restart OpenRC System", a window opens in which the burn station and a password are required. After a successful authentification the system is completely restarted. This means that all running jobs are canceled and all drives are emptied.
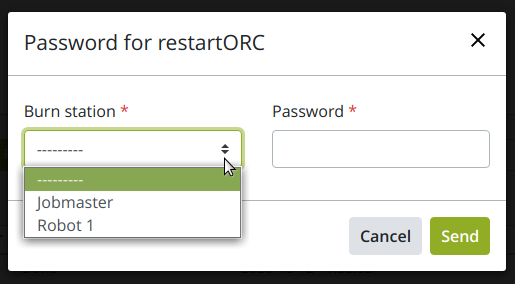
Figure 37: System control - Restart OpenRC system
5. Shutdown system
When the user clicks on the function "Shutdown System", a window opens in which the burn station and a password are required. After a successful authentification the whole system can be shut down.
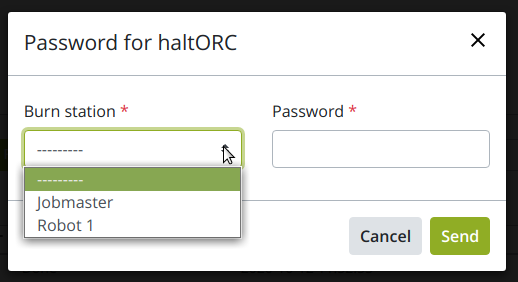
Figure 38: System control - Shutdown system
6. Reboot system
When the user clicks on the function "Reboot System", a window opens in which the burn station and a password are required. After a successful authentification the whole system will be rebooted, which includes a restart of the system.
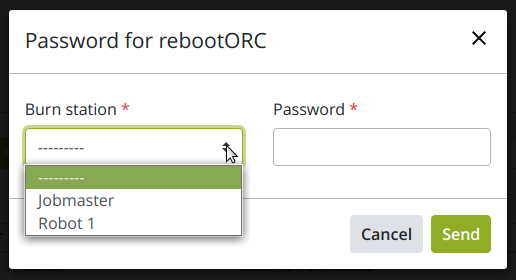
Figure 39: System control - Reboot system
7. Download logfiles
To download the log files for debugging or problem analysis, only one click on the link in the system control drop down menu is necessary. The download will start automatically and can be extracted afterwards in the file system.
Possible error Handling
When the whole service is unavailable, a message (as shown in figure 40) occurs on the screen. The user has to wait until the notification disappears.
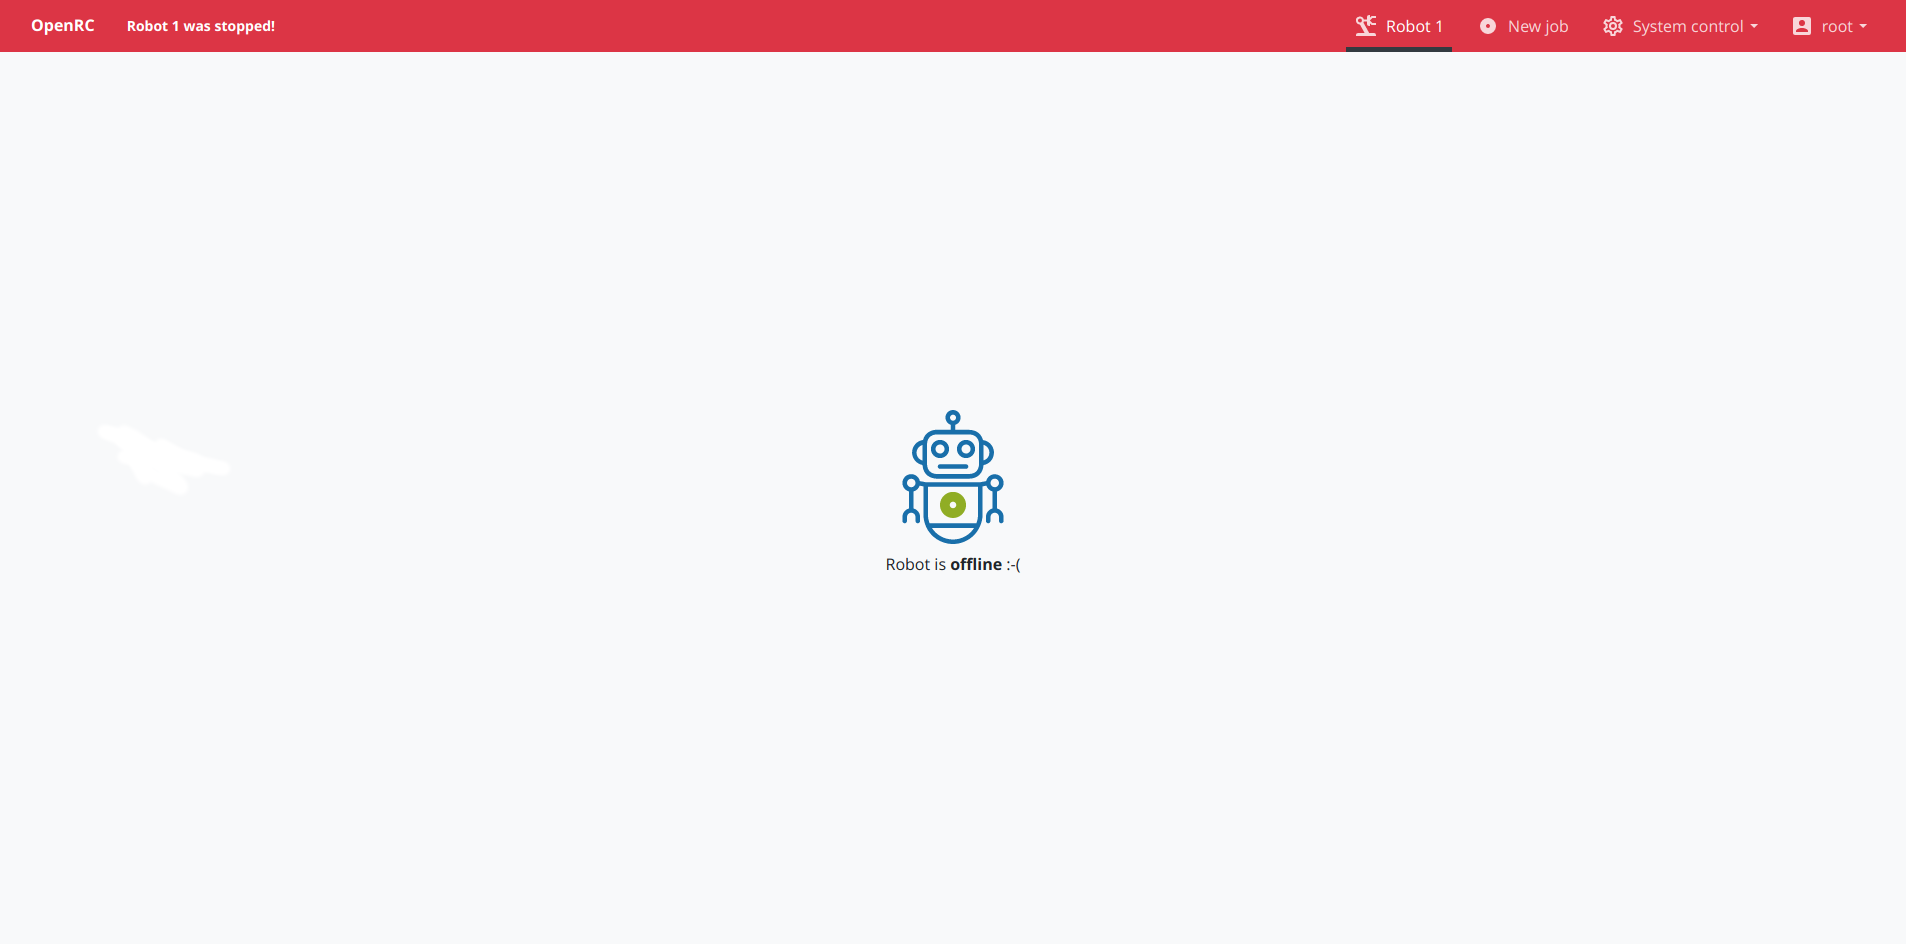
Figure 40: the web interface shows an unavailability of the system
Inhaltspezifische Aktionen


